4 Process - Follow Actions
Ableton has had “Follow Actions” within Session View clips for a long time. Follow Actions allow you to perform a variety of actions at the end of a clip or after a given number of bars and beats. Follow actions are generally used where there are a number of clips within a track, allow the performer or Lazy Producer to automate moving from one clip to another. This allows you to determine a sequence of events - moving from one clip to another or playing the clip again, etc. There are a number of really useful uses for follow actions for live performance, but it also has incredible uses for making generative music. Follow Actions help govern the amount of variability in our generative sequences - whether there is a definite sequence of events that happen predictably, or whether there is an element of chance introduced.
Key idea
Follow Actions allow the Ableton user to automate moving from one clip in a track to another. This automation can happen at the end of the clip or after a given number of bars and beats. In order to use Follow Actions, the clips in the track have to be contiguous - that is, no gaps between the set of clips.
Even if the notes inside a (MIDI or Audio) clip are fixed, Follow Actions can be used to move from one clip to another. This allows the Lazy Producer (or Lazy Performer!) to set up clips that contain pre-composed riffs, rhythmic patterns, melodic lines, chords etc. and then get Ableton to help sequence these in interesting ways.
Clips can also contain nothing at all. And these empty clips can have different lengths. So if you need space between melodic phrases, you can get Follow Actions to play an empty clip. At the end of the empty clip, you could play more of nothing, or jump to a specific clip that holds the next phrase.
4.1 Follow ACTIONS
To see the Follow Actions for a clip, click on the “Launch” item to expand the section. To enable Follow Actions for the clip, click on the the button marked “Follow Action”, and ensure that it is active / orange.
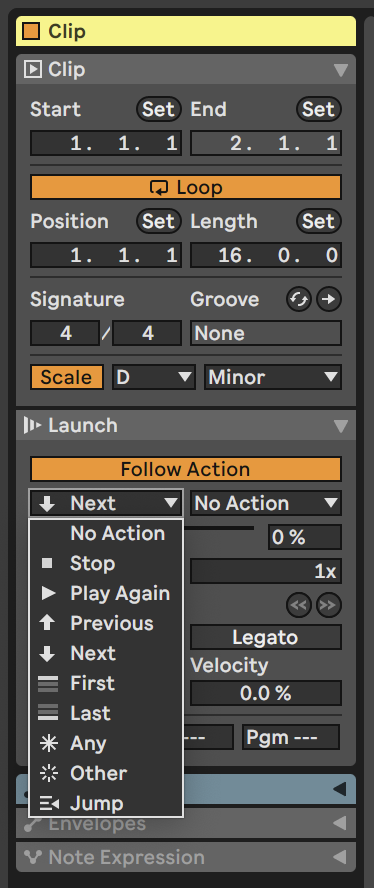
There are many different possible actions with the Follow Action. These are mostly self-explanatory but there are a few subtleties that are worth pointing out. As we point out above, Ableton needs to have contiguous sets of clips within a track to enable Follow Actions. The “First” and “Last” options above refer to the first and last clips within that contiguous set, not necessarily the first and last within the track. The “Any” option randomly jumps to any of the clips within the contiguous set, including the current clip. “Other” randomly jumps to a different clip within the set. “Any” can be useful when you want to allow a repeat of the currently playing clip, while “Other” is more useful to force a jump to a different clip. “Jump” allows you to nominate a specific clip to jump to. “No Action” can be used as a “catch all” default action. With “No Action” in the alternative (right hand) Action, you can automate Ableton moving to a different clip after a certain number of bars and beats, but if this option is not taken then the clip continues playing to the end of the clip.
4.2 FOLLOW Actions
In previous versions of Ableton Live, Follow Actions were set up so that the user had to specify a number of bars, beats and subdivisions before the action would happen. This leads to a lot of mental arithmetic to determine how many bars and beats AFTER the clip starts to make the jump. Fortunately now in Live 11 the default is to apply the Follow Action at the end of the clip, as long as the “Linked” button is active.
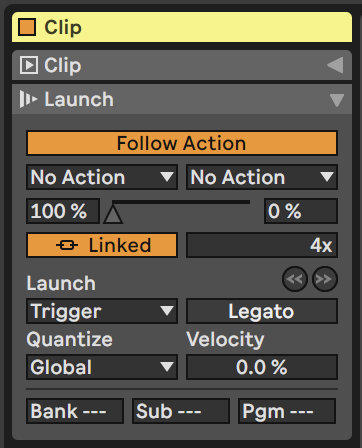
There is also the option to play the clip a number of times before applying the Follow Action. This helps us balance between the familiar and newness - hearing something repeated helps reduce the randomness and uncertainty of constantly introducing new things. While repeating one part or track you can introduce something new with a different part or track.
The Legato option is also useful. If the Follow Action is applied in one clip, and if Legato is active, then the clip that is triggered next will pick up from the number of bars and beats in the previous clip (where Follow Action was applied). This can be useful for applying different endings to clips (the equivalent to fills in drum / rhythmic parts). That is, you can play 3 bars of one clip, then use the fourth bar of some other clip to provide the ending of that clip, then apply a Follow Action to go back to the first clip, on to a different clip or loop around to the beginning of the currently playing clip. This allows us to set up automation that introduces musical ideas, rather than changing clips together, or only at the end of clips.
4.3 Follow Action probabilities
By default Live will perform the specified follow action with 100% probability i.e. it’s guaranteed to happen. But there is a second option where the action is performed with a given probability, and with 100% minus that probability it will perform a different action (probabilities MUST add to 100%). For example, it could do action 1 with 70% probability and action 2 with 30% probability. Like the coin-flipping in Note-wise probability that we talked about in the previous chapter, here we have a biased coin, determining what happens next. With 50% - 50% Ableton flips the coin and chooses which action to take next. With 70% - 30% the left-hand action will happen more, but there’s still a chance of the right-hand action happening.
The automation and probability here allows a HUGE range of possible journeys through a sequence of clips. If you introduce a 50% Play Next probability on the clips in the Changing Chords recipe, then it will stretch out the changes across clips as some of them will loop and continue playing the same chord for longer.
4.4 A Random Walk
In statistics there is a thing called a “Random Walk” where we take a step forward or backward with a given probability, or stay where we are. With certain probability set ups, it’s possible to stay in the system for a LONG period of time, taking steps. Random Walks can also have “absorbing states” at the end. This would be an equivalent of a “Stop” action in the Follow Action dialogue box above. Using random sampling and probabilities you could simulate and work out the likely playing time of your generative piece.