13 Tools - MIDI Generators
The MIDI tools discussed in the previous chapter are useful to transform, augment and add notes to existing MIDI sequences, but we also need to generate those sequences in the first place. Ableton Live Suite and Max for Live plugins offer a few options to generate sequences of notes.
Key idea
You can play or program in sequences to be used as the basis for generative music, and we did exactly this for Recipe - Changing Chords. But to create melodic or note sequences you may also wish to use a MIDI note generator like those discussed below. All of these devices will create MIDI note sequences - all of them can use random probability to generate note sequences that constantly change or evolve. As we have discussed in the section [Process - Balancing the unexpected with the predictable] too much randomness can be difficult for the listener to engage with. Fortunately, most of these plugins allow you to tailor the amount of randomness or to slowly evolve.
If you ever thought that DAW sequencers were too limited compared to modular synthesiser setups, I challenge you to review the tools below (and others available via Max for Live) and find holes in functionality. (But don’t email me to argue, find them and let me know. Submit an Issue to tell me that there’s a different sequencer that I haven’t talked about!)
In Ableton Live 11 Suite, there are many plugins that will generate note sequences and allow you to specify per note probability. Many of these were developed before Live 11 introduced per note probability in the MIDI piano roll.
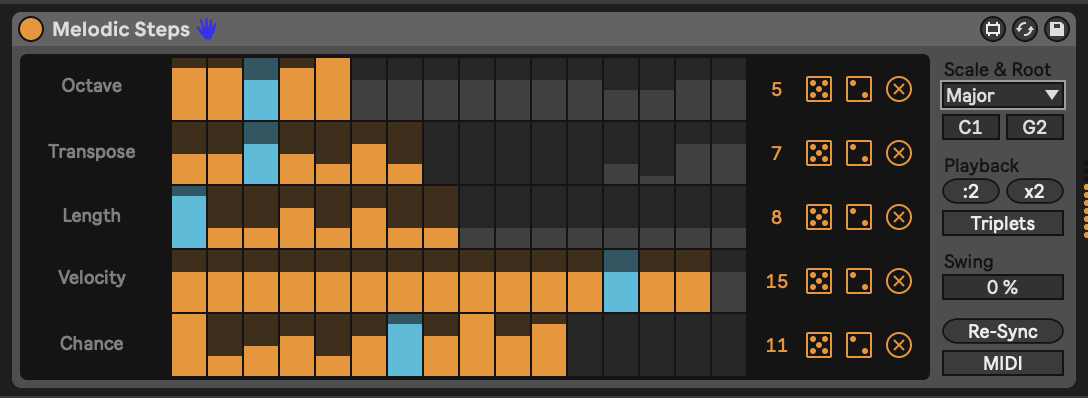
13.1 Melodic Steps
Melodic steps (Max for Live sequencer provided with Ableton Live 11 Suite) is a sequencer that disentangles note pitch, octave, length, velocity and probability. This allows you to sequence these attributes separately. You can define the length of each sequence separately, so you can have all sequences with the same length for predictable MIDI sequences, or change the length of one or more to produce more elaborate patterns. Having sequences that are even numbers of steps will bring you back to repetition faster than having sequences that are prime sequences (remember common factors from your elementary arithmetic lessons?). Note that each lane has the option to “roll the dice” and add randomness, either a little (score 2 dice) or a lot (score 5 dice). Also, note that the “Playback” setting can choose to play back at twice the speed or half the speed.
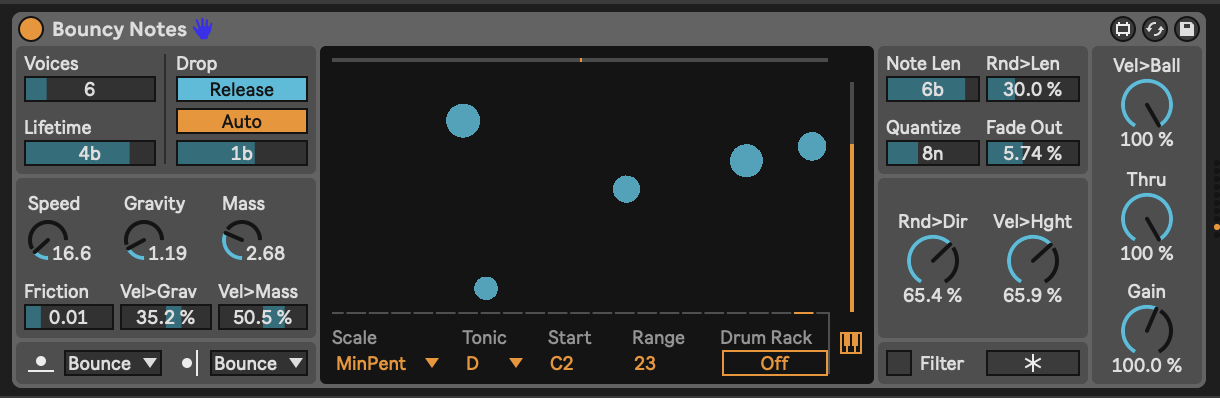
13.2 Bouncy Notes
Bouncy Notes is a device provided in the “Inspired by Nature” pack developed by Dillon Bastan. This device gives you the ball-drop bouncy repeats triggered by incoming MIDI notes, or with a little tweaking you can get it to automatically produce balls which trigger MIDI notes on a scale, quickly or slowly, resulting in nice echoes and cascades of notes. The balls bounce on the keyboard along the bottom triggering MIDI notes. You can choose whether the balls bounce back up to trigger notes again (“Bounce” settings) and whether the balls bounce off the “walls”. Both of these will keep the balls in motion for longer. Tweaking ball speed, gravity and mass will affect how quickly (or slowly) the balls move around inside the box (“Speed” setting). Higher “Gravity” settings will mean that balls drop towards the MIDI notes more quickly. If you recall physics lessons from school, then you may remember that “Gravity” AND “Mass” affect how quickly notes fall (unless they are in a vacuum). So balls with larger mass fall more quickly under the same gravity. You can affect these via input velocity using “Vel>Grav”, “Vel>Mass” (and in fact “Vel>Hght” and “Vel>Ball”). All together this sets up some physical (pun intended) rules by which the balls move in the space and how they interact with the walls and “floor” which triggers the MIDI notes.
In the screenshot below I have specified that all generated notes should be quantised to D minor pentatonic. I have also chosen for notes to be generated automatically every bar (Drop setting to Auto and “1b”) and last for at most 4 bars (“Lifetime”). At any one time we’ll have at most 6 balls in play (“Voices”). I have also set the note “Quantize” to be eighth notes = 8n. This ensures that the note triggers will not clash with anything else going on in the sequencer that is rhythmic or on the beat. But tuning the “Speed” setting you can tailor the density of notes generated. Adding randomness on direction that the balls are travelling when they are generated “Rnd>Dir” you can generate additional notes in the scale as the balls bounce off the sides and hit the “notes” on the bottom.
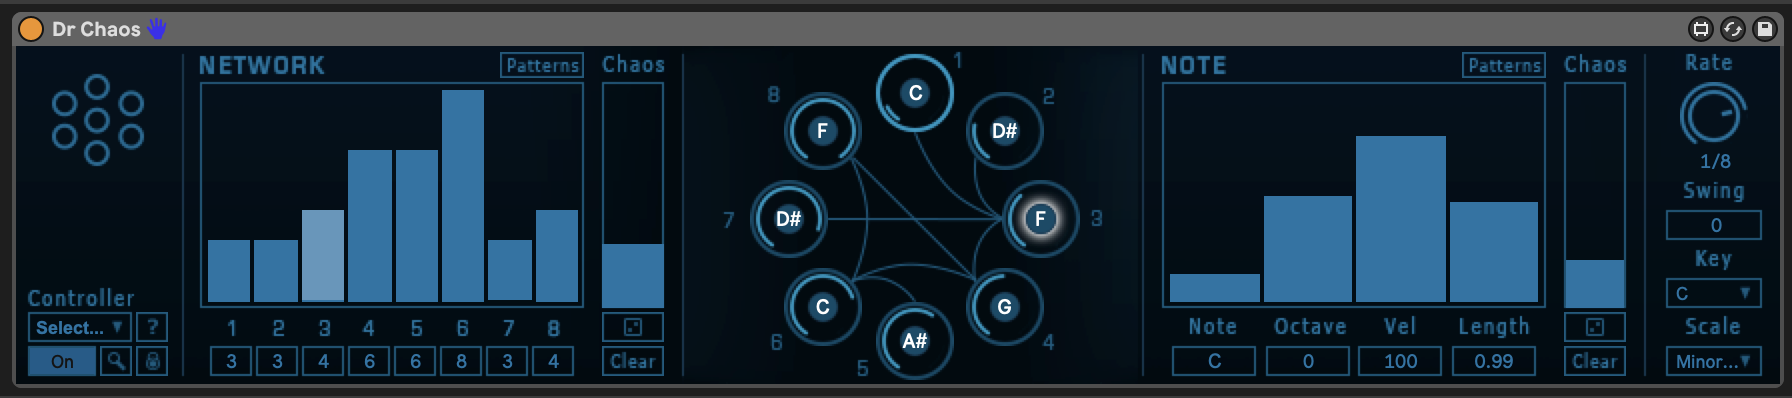
13.3 Dr Chaos
“Dr Chaos” is part of the Probability Pack by Sonic Faction. This plugin allows you specify a sequence of notes across 8 steps. Notes can be quantised to notes in a scale using the drop down “Scale” setting on the far right at the bottom. The Network panel on the left dictates the order of notes. In this example, Note 1 “C” will be followed by Note 3 “F”. Note 2 “D#” will also be followed by Note 3 “F”. This sequence as defined means that when press “Play” and start the transport in Ableton then the “D#” note won’t necessarily play (since we start at Note 1 “C”). BUT in this case we have a little “Chaos” dialled in to the notes, which adds a little randomness, which might occasionally play the “D#”. Like the “Melodic Steps” sequencer above, Dr Chaos also allows you to define potential Octave, Velocity and Length of each note and add randomness to that through the “Chaos” slider. This adds some extra “spice” to the sequence. We can also specify the “Rate” of the sequence, so you can generate faster or slower sequences.
Dr Chaos can store a number of patterns for both the note network (left) and the note attributes (right) so it’s possible to set up sequences that you want to use and play through these, or jump to specific combinations.
I like Dr Chaos because you can set up networks of notes that will give potentially nice sounding sequences, but randomness can kick in to take you somewhere else instead. It breaks you out of the typical sequencer where the sequence of notes is predictable, even if probability is intervening to stop some notes from happening every time.
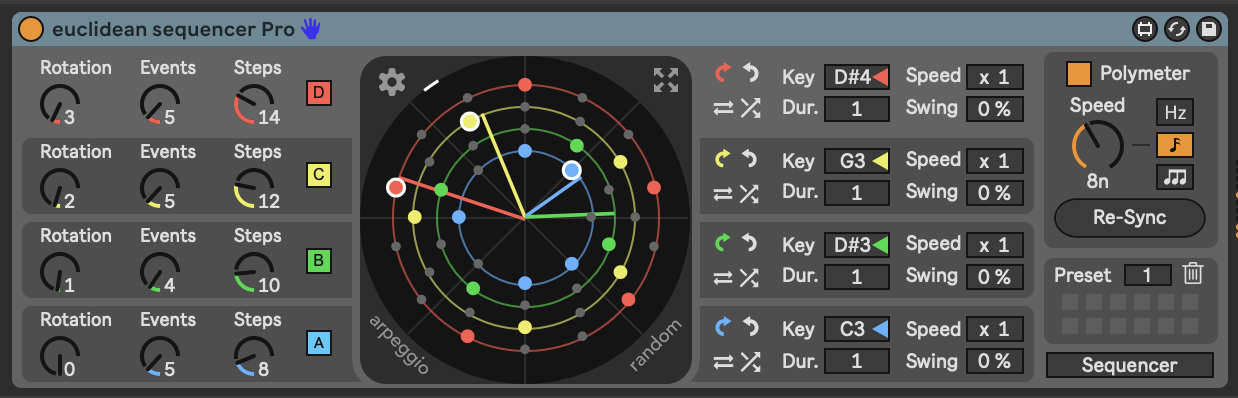
13.4 Euclidean Sequencer Pro
Euclidean sequencers are commonly found in modular rigs, where can produce interesting polyrhythms for melodic instruments and also interesting rhythmic sequences for drum sounds. This Max for Live Euclidean Sequencer is an implementation of that for Ableton Live. Euclidean sequencers work by defining the number of steps in one rotation of a circle, then allocating a number of events as evenly as possible around the steps in that circle. All sequences start at the twelve o’clock position unless you specify a “Rotation” amount to offset the starting point. You can also specify a “Speed” setting for each of the four sequences, nominate a note that corresponds to each sequence (especially useful when used in conjunction with a drum rack). Particularly useful for generating sequences that are rhythmically interesting.
I have used the Euclidean Sequencer Pro with non-rhythmic ideas as well. Choose four notes e.g. C3, D4, G3 and A#3/ Bb3. Setting a pattern with more sparse settings for D4 and A#3 can give some interesting patterns and chords. I combined this with the Random and Scales plugins described earlier to add some variation to the generated notes.
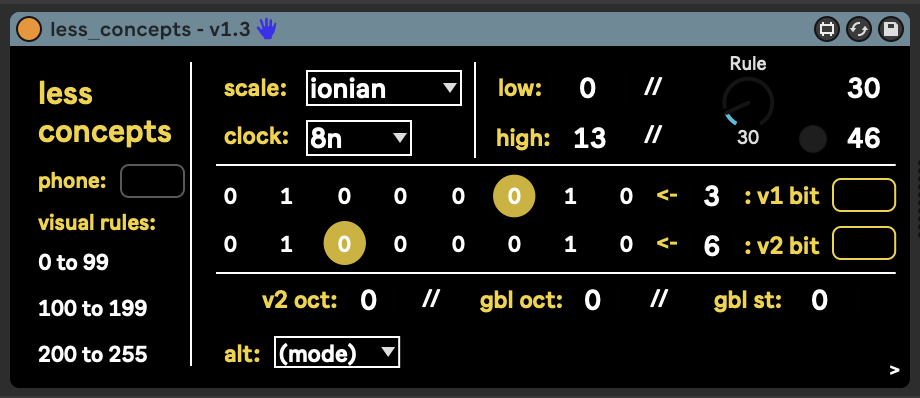
13.5 Less Concepts
Less Concepts is a sequencer. How it works is complicated. That it works is down to maths, permutations and combinations of cell values and adjacent cell contents.
less concepts is rooted in the idea that complexity is just a shit-ton of simplicity, chained together. at its core, less concepts holds 65,536 possible combinations of notes which can be gated, offset, and manipulated to create minimal sequences for improvisation. small changes to a single parameter can bring sweeping or subtle changes.
seek. think. discover. - Linus Schrab
Suffice to say that it generates sequences or bursts of MIDI notes that can be used in generative music. That it’s available as a free Max for Live device is down to the generosity and genius of the musician and developer Dan Derks.
Less Concepts produces MIDI sequences rather are less random and slightly more melodic. The key items to focus on here are the “Rule” setting, which in the screenshot below is 30, and the “Seed” setting which is 46. Different rules provide different rhythmic / melodic results and the “Seed” setting results in slightly different variations of that rule. For a given Rule and Seed you will always get predictable results, so if you use Less Concepts and fix the starting Rule and Seed you can always guarantee the same result. But one trick I’ve played with is to use a random LFO to vary the seed every 4 bars (or more) to balance unexpected and predictable, as we’ve discussed before.
The “low” and “high” settings define the range of notes that will be used in the sequence.
Less Concepts is definitely a sequencer that invites exploration, trial and error. Sometimes the results are surprising, other times they fade away and you’re left in silence. If you need further explanation of what’s happening under the hood, I suggest you explore the notes that Dan Derks provides.
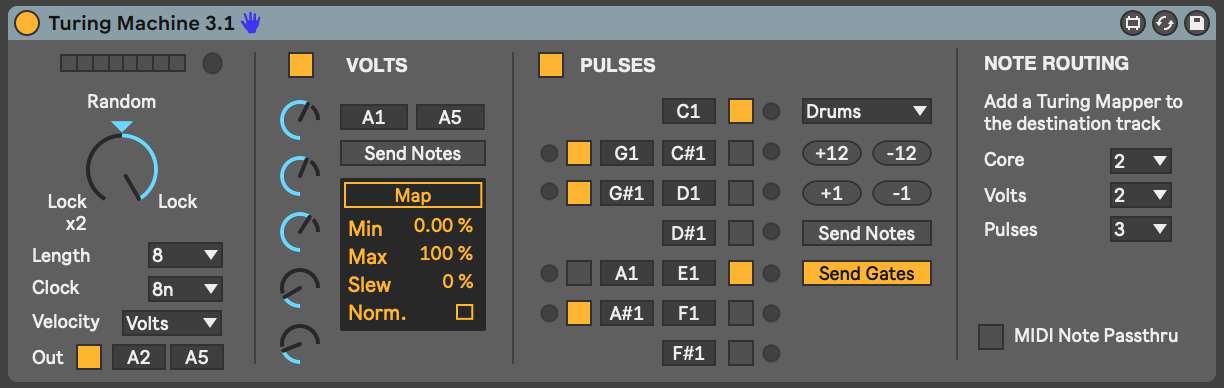
13.6 Turing machines
How Turing machines work for pattern generation involves things called Shift Registers and moving zeros or ones down a line. Sound & Voltage has an excellent description here: https://www.youtube.com/watch?v=va2XAdFtmeU if you want to dig into that and understand better. But it’s what they do that is of interest to the Lazy Producer. It’s a device that spits out random sequences of notes, until you move a dial and “lock in” a pattern. Move the dial a little way back towards the random (middle position) and the device will repeat the locked in sequence, but add occasional new notes. What’s of interest then to the Lazy Producer is the ability to move gradually from random to repeating, predictable sequence and anywhere in between allowing us to balance the unexpected with the predictable.
In the image below the key part is the left hand end of the Turing Machine. If the dial is set to “Random” then we get a random sequence of notes in the given range (here between A2 and A5) based on the specified clock setting - in this case 8th notes. If we turn the dial completely to the right to “Lock” then we will lock in a repeating sequence of given length - here 8 notes. As we move the dial gradually back to the “Random” setting then we introduce a chance of random changes to the pattern, with the chance of randomness depending how close we are to the “Random” setting. What this means in practice is that we can Lock a sequence, gradually turn the dial back to allow changes to that sequence, then Lock again to “capture” that change. If we turn the dial all the way to the left then we also Lock the sequence, but the repeating sequence will be twice as long i.e. it will take twice as long to come back to the start of the sequence. Because what is generated is a random sequence, we might want to apply a Scale plugin to this to quantise the note outputs and conform them to a particular scale.
The Max for Live device shown below includes additional features to map output “voltage” signals (modulation) from the Turing Machine to devices in Live, and to use the Gate information from the Turing machine to trigger devices like drum machines. These extensions to functionality are still driven by the same essential random processes and “locking in” sequences discussed above.
13.7 MIDI Waves
MIDI Waves is a paid Max for Live plugin from Isotonik and Ned Rush. It is a very useful MIDI sequencer based on the principle of quantising base LFO waveforms through sample and hold. The base LFO waveform (in the screenshot below it’s a Triangle wave) runs at a specified rate, either Hz or Synced to Ableton’s clock. Pitch values here are sample at a separate rate (here 16th notes) to generate ascending and descending note pitches. The rate of sample and the rate of the base LFO dictate how closely the generated pitches follow the base LFO but can sometimes result in sequences that follow arpeggio like patterns, but not quite (due to slight differences between the base LFO and the sample rate). Note that a second LFO is available to add into the base LFO as a frequency modulation (FM) and you can choose the frequency, shape and amount to be added to the base LFO. This can add more random variability in the pitch sequence generated. Note that the FM LFO is added before the blue “sampling” process. So the Sine LFO here is adding a little positive and negative to the base triangle LFO before sampling, resulting in pitch sequences that change subtly each time. Similar processes can be used to generate Velocity, Duration and Gate information. Gate in particular allows you to define the rate at which notes are generated, independent of their pitch. What can result is slight changes in the rhythms of the generated notes, right up to their being clusters of notes, rather than a steady stream.
This technique is sometimes employed in modular synths if a more traditional sequencer is not being used, as all you need to drive it is a base LFO and a “sample and hold” random generator.

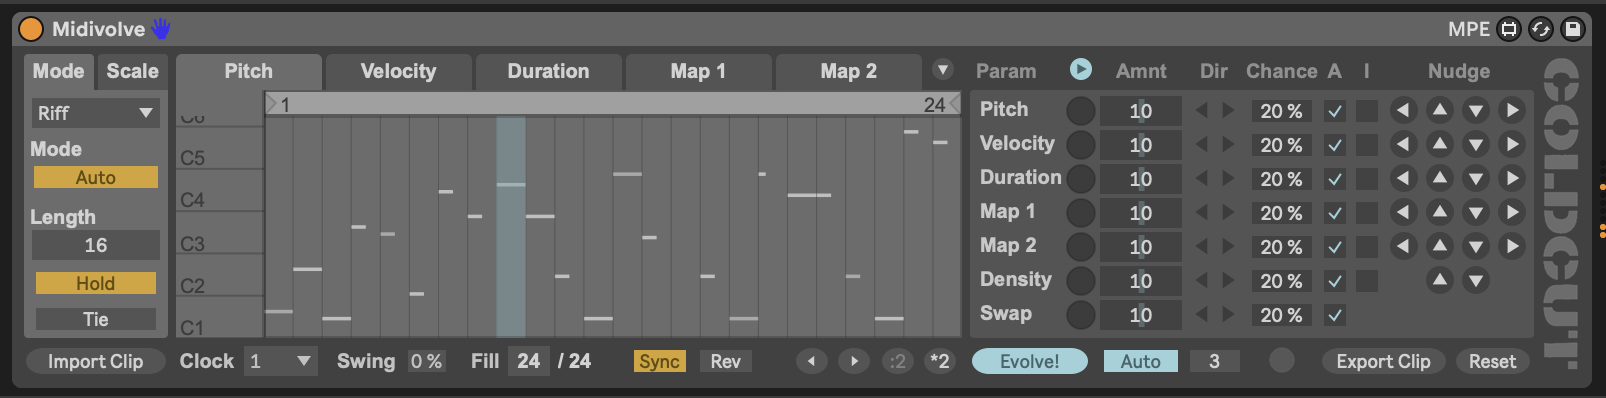
13.8 Midivolve
The Ableton Max for Live pack and device with Coldcut - Midivolve Pack is a paid plugin for Ableton Suite. It works by randomly adding variation to MIDI clip in the track where the plugin is placed. That variation can act on MIDI notes, velocity, duration, density (how many notes are playing) as well as being able to map two different parameters in Live. The “A” column defines which parameters experience variation on the next “Evolve!” trigger (in the screenshot below this is set to automatically evolve all parameters once the clip has played through 3 times). If the “I” column is checked then the last evolution acts as the basis for the next variation change. Note that variation amount can be specified via “Ammt” and this is separate to “Chance” of the variation happening. Chance is the probability of the value being varied / evolved for each note / step. This opens up a large number of possibilities to vary input sequences but to balance the unexpected evolution with a repeat of the evolved pattern before the next change is made i.e. let the listener get used to each chance - being predictable, if only for a finite period. Variation can be constrained through the Scale settings.
13.9 SEEDS - Polymath and friends
Seeds from Novel Music is actually a collection of sequencing plugins that offer modular synthesiser style control over clocks, note sequences, scales, and much more. This is a paid pack of Max for Live devices, but if you are interested in a collection of tools for modular style sequencing with Ableton Live there is a HUGE amount of potential in this pack. In fact, I can’t do justice to the full set of features available, and I can only recommend that interested users look into the tutorial videos prepared by Novel Music to describe their functionality.
In the screenshot below I’m using the “Sweet 16” clock module from SEEDS which provides four different clocks which can be used by Polymath. Each clock proceeds at a different pace, all driven by Ableton Live’s master clock i.e. Ableton provides the “1/16th” pulse that drives the clocks. Each clock is allocated a label - here “W”, “X”, “Y”, and “Z”. This helps to identify the clock drivers in other devices.
Polymath is a four track sequencer. Each track specifies notes, octaves, velocity, duration, strum, ratchet, bend (pitch bend) and mod. The sequence length is set for the track. If you look to the right the “Deviate” setting allows you to add some random probability to each element of the sequence. In fact, Novel Music provides a free device “Deviate” that provides JUST this functionality if that’s all you need.
Polymath has a neat trick up its sleeve. It allows you to set scales for each track (and in fact across ALL tracks) and you can set two different scales then use a slider to begin to introduce notes from Scale 2 in the sequence even though the majority are from Scale 1. When the slider is all the way to the right, then Scale 2 is 100% in effect. Similarly on the right-hand side, a slider allows you to introduce random variation but then “LOCK” that variation if you stumble onto something you like.
The “Expand” setting adds additional notes to the sequence, always honouring the Scale set for the sequence. This can be dialed up and back so it’s possible to add additional notes and then go back to the original sequence.
Each track can run to a different clock, so it’s possible to set up four different sequences that proceed at different rates. Very handy for generative music. Also, the sequences can run forward, back, forward-then-back, and randomly. So somewhere in there you should be able to find a sweet spot to generate some new ideas.
The SEEDS pack also includes very useful plugins that can send output to and from various devices and clocks. The “Hub” plugin receives and sends MIDI information from one track to another. So it’s possible to have generative plugins on one track which send MIDI information to a completely different track, which can then be processed independently.

13.10 Others I haven’t mentioned
Tom Glendinning / ELPHNT is keeping a curated list of Max for Live plugins he uses in his music which includes some excellent sequencers. If I haven’t touched on your favourite Max for Live sequencer here, you should check out Tom’s list and review what he’s presenting.
For example the MDD_____SNAKE device is based on the Make Noise Renee modular sequencer. Tom has provided a very helpful introduction here.