6 Process - Routing MIDI and Audio
In the spirit of “The Lazy Producer” I like to reuse MIDI and Audio inputs across many tracks, often adding MIDI effects (as discussed) or audio effects. The benefit of this is that the tracks which reuse the same input are related to the original in pitch but with different timbre if they use different synth sounds, or have different audio effects applied. In Ableton Live it’s trivial to route one track (either MIDI or audio) into another - either through “pushing” the output of a track to another or specifying that a track takes the output of another as “input” and then monitoring that input.
Key idea
Reusing MIDI or audio tracks across many channels ensures that the different tracks are related in their input source, even if additional MIDI or audio effects are applied. This provides a level of coherence between sounds and tracks, the “predictable” in our balance between unexpected and predictable. This helps the listener hear the sounds as coming from the same “family” even if the actual sounds in each track are different. Exploiting this, it’s possible to layer up tracks that are pretty much guaranteed to work well together, while exploiting different sound sources, timbres, even pitches (if using MIDI input) or resonances (if using Audio input).
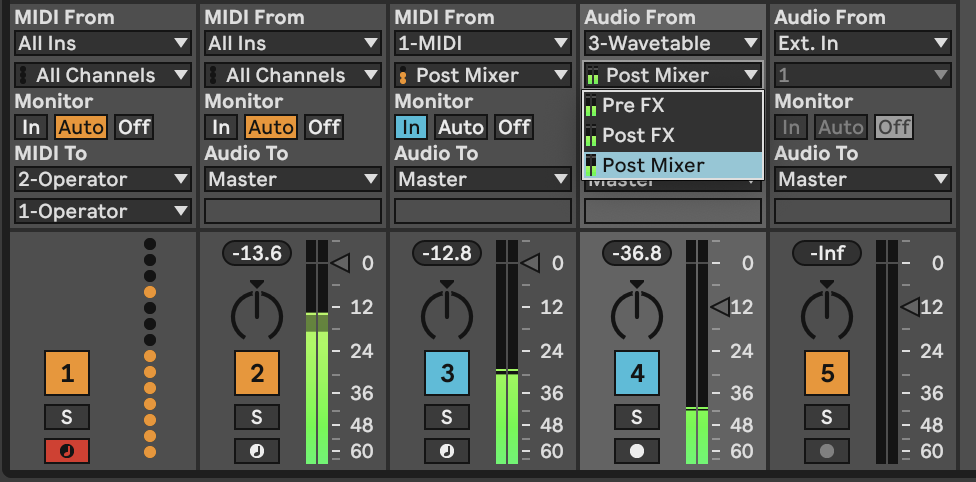
In Ableton Live we have a couple of ways to either “push” or “pull” MIDI or audio from one track into another. In the image below, MIDI received by Track 1 is “pushed” (via MIDI To choices) to Track 2 which contains an instance of Operator. The second box below the MIDI Track specifies that the MIDI is to be sent to the input of the first MIDI device in this track - the Operator instrument in this case. You don’t have to have this specified, but in this case it means that the Monitor setting in Track 2 can be left on “Auto”. You can also route the input to a specific device in an instrument rack. You can use this approach to send MIDI from multiple MIDI tracks to the same device. For example if you have separate MIDI patterns for Kick, Snare and High-hat these can be sent to the same instrument track containing a Drum Rack. This can be useful if you want to apply MIDI effects, randomness, follow-actions or modulation to the high-hat but not the kick.
The third track (MIDI) here is “pulling” the MIDI from Track 1. Note that the Monitor is set to “In” so that it “listens” for the MIDI being sent. In this case I can add a MIDI device like Note Length to “stretch” the incoming MIDI and then apply an Arpeggiator to that to produce new moving parts that are related to the sequence in Track 1, but different.
The fourth track (Audio) here is “pulling” the audio from Track 3 (Wavetable). Similar to Track 3, it needs the Monitor set to “In” to “listen” for the audio output. In this track we’re also showing the various options for where to grab audio - it can be “Pre FX”, “Post FX” or “Post Mixer”. “Pre FX” means that the audio is grabbed by the track before it goes through any audio processing on the input track. So you can apply different effects to the same raw audio source - some on Track 3 and some via Track 4. “Post FX” means that it grabs audio after effects have been applied. “Post Mixer” means that track volumes and panning are applied prior to grabbing the audio. “Post Mixer” might be handy if you wish to control levels from only one track.
In MIDI tracks the “Pre FX” and “Post FX” apply to MIDI effects as well, so you can grab MIDI inputs either before MIDI effects are applied, or afterwards. Since Ableton’s track routing works this way consistently, it’s possible to add intermediate MIDI tracks with no instruments, but “listening” to the MIDI output at a particular state (“Pre” or “Post” FX on the source track) and then have additional tracks that exploit the intermediate track. This flexibility and ease of routing is a massive bonus for Ableton. It’s possible to reuse inputs across multiple tracks in multiple ways to do a huge range with them. In particular I use this technique to build texture, especially in “drone” tracks where I can apply different resonators, textural effects to audio inputs from the same source and then blend these across tracks.
An alternative approach to the same problem would be to employ “Instrument Racks” or “Effect Racks” in one track. However, the benefit from the approach above is that each track can then use Return track sends to apply effects. It also makes live performance somewhat easier since you can quickly see the levels of each track and control these via a MIDI controller device like Ableton Push.

The flexibility and ease of routing audio and MIDI around in Live makes it a very versatile platform for creating complex signal paths, and apply different effects and modulation at a variety of points both before the MIDI information is used by an instrument, and after the audio is creating via the instrument and effects.